
The control starts up in Incremental jog mode. In order to jog the axes in continuous movement, you need to press the INCR/CONT key to switch from incremental to continuous jog mode.
The Machine Home position is fully X+ (cross slide forward) and Z+ (carriage right).
You cannot home the machine with the tailstock advanced. Avoid shutting the control down with a between-centers job in progress.
|
The control starts up in Incremental jog mode. In order to jog the axes in continuous movement, you need to press the INCR/CONT key to switch from incremental to continuous jog mode. |
Tools and offsets are numbered 1 through 99. Any offset number can be used with any tool number. However, for simplicity you should use matching tool and offset numbers.
I recommend measuring tool Z offsets relative to one of the tools to be used on the current job, and measuring X offsets relative to an arbitrary "imaginary" reference.
The procedure for this may be found at http://www.cncsnw.com/OLEL.htm, as "Method 3".
The machine has a safety switch on the chuck cover, which will remove power from the servo and spindle drives when the chuck cover is raised.
After you have changed parts and closed the chuck cover, you must press and then release one of the Emergency Stop buttons in order to reset the servo and spindle drives.
The apron control panel includes electronic handwheels for manual movement; Spindle High/Low range control buttons; duplicate Emergency Stop, Cycle Start and Feed Hold buttons; and a lever for manual spindle forward/reverse/stop control.
The electronic handwheels must be enabled using the MPG button on the console jog panel.
The handwheel rate is controlled by the x1, x10 and x100 jog increment buttons on the console jog panel.
The apron panel is mounted on slides on the front of the machine. You can optionally lock the apron panel to the carriage, so it travels left and right with the carriage. To lock the panel, line it up with the left side of the carriage, then raise the locking lever on the left side of the apron panel.
You must unlock the apron panel before running any automatic program cycles, and also before using MDI mode, homing the machine, or using Tool Check.
The machine has a dual-winding spindle motor. The control can switch between the high-speed windings and the low-speed windings on command. Switching is by automatic M functions or by apron panel buttons, as follows:
| M41 | High Range (100-3500 RPM) |
| HIGH SPEED | |
| M41 | Low Range (50-2000 RPM) |
| LOW SPEED |
Spindle start, stop and reverse are controlled by automatic M functions when Auto Spindle mode is selected. Start, stop and reverse are controlled by jog panel keys and the lever on the right side of the apron when Manual Spindle mode is selected.
 | Toggle Spindle control between Auto and Manual |
| M3 | Start Spindle Forward |
| Apron lever Down | |
| M4 | Start Spindle Reverse |
| Apron lever Up | |
 | Select Spindle Forward |
 | Select Spindle Reverse |
 | Start Spindle in selected direction |
| M5 | Stop Spindle |
| Apron lever Center | |
 |
In normal operation, the Auxiliary keys on the jog panel have the following functions:
 |
Enter Z Part Position (P188 = 1) |
 |
No function |  |
Accept Part Position (P190 = 4) |
 |
One-Shot Turning Cycle (P191 = 57) |
 |
One-Shot Chamfer (P192 = 56) |
 |
One-Shot Radius (P193 = 59) |
 |
No function |  |
No function |  |
No function |
| Aux10 | No function | Aux11 | No function | Aux12 | No function |
| Aux13 | No function | Aux14 | Maintenance Mode On/Off |
The one-shot functions are assigned using Centroid Machine Parameters 188 through 199, as indicated above. See Chapter 14 of the T-Series Operator's Manual for Parameter setting instructions and options.
| M0 | Stop (wait for Cycle Start) |
| M1 | Optional Stop (wait for Cycle Start) |
| M2 | Program Restart (with wait for Cycle Start) |
| M3 | Spindle CW / Forward |
| M4 | Spindle CCW / Reverse |
| M5 | Spindle Stop |
| M8 | Flood Coolant |
| M9 | Coolant Off |
| M26 | Set Axis Home (only used in machine homing macro) |
| M41 | Spindle Low Range |
| M42 | Spindle High Range |
M functions M91 and above are used internally in custom macro programs, but are generally not used directly in user machining programs.
See Chapter 12 of the Centroid T-Series Operator's Manual for descriptions of the higher-numbered M functions.
Most servo drive parameters are set to factory defaults.
The following parameters are set to values other than factory defaults:
Parameter |
Value |
Meaning |
Cn-01 |
008Ch |
Specify /N_OT and /P_OT not used |
Cn-02 |
Z: 0001h |
Bit 0: Reverse Rotation |
X: 0000h | ||
Cn-03 |
Z: 280 |
Speed Reference Gain (RPM/V) |
X: 210 | ||
Cn-04 |
55 |
Speed Loop Gain (Hz) |
Cn-0A |
2000 |
Encoder output cycles/revolution |
Cn-11 |
8192 |
Motor encoder cycles/revolution |
Cn-2A |
142 |
Motor type |
See the Yaskawa SGDB (Sigma I) servo drive manual for detailed information on these and other servo drive parameters.
The PLC program can generate the following fault messages, in addition to those listed in the Centroid operator's manual.
You can use the PLC Diagnostic display on the console to view some of the Centroid PLC input and memory locations mentioned with these error and fault conditions. At the control's main screen, press Alt-I to activate the PLC Diagnostic display. Press Alt-I again to dismiss it.
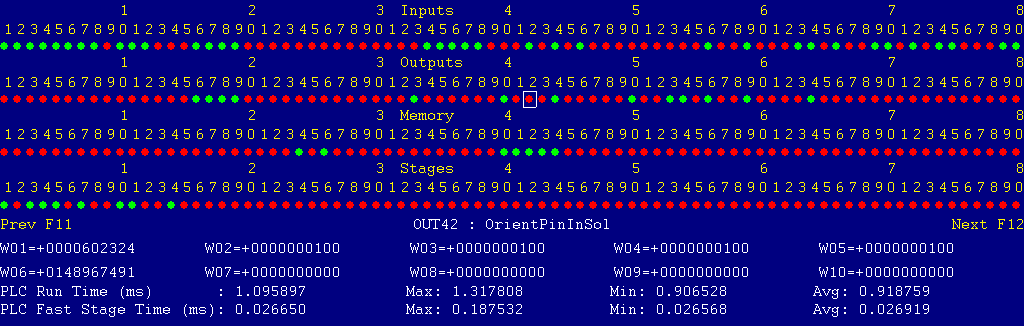
Each page of the Diagnostic display shows four rows of red and green dots: the first row shows PLC inputs 1 through 80; the second row PLC outputs 1 through 80; the third row PLC memory bits 1 through 80; and the fourth row PLC program stages 1 through 80.
You can use the arrow keys to move a highlight box over any of these locations. The name of the highlighted location will be displayed in the center of the screen below the red and green dots.
For example, in the illustration above the highlight box is on Output #42: The dot below the 2, to the right of the superscript 4, on the second line.
Below the four rows of bit status information are ten numeric ("word") variable values, labeled W1 through W10. Some of these variables also hold useful status information, described with the error and fault conditions to follow.
There are multiple pages of Diagnostic data. With the Alt-I diagnostic display showing, you can use the F12 and F11 keys to scroll right and left. For example, pressing F12 once will shift to the page showing inputs and outputs 81 through 160, and word variables W11 through W20.
Messages with 9000-series message numbers are Faults. After resolving the problem, you must press and release the Emergency Stop button to clear a Fault.
Messages with 8000-series message numbers are Errors. Errors will cancel the program cycle and stop the spindle and coolant, but they do not then need to be explicitly reset.
Messages with 5000-series and 2000-series message numbers are Warnings and Informational Messages. They do not cancel the cycle or require any action to reset.
The control detected an internal error in processing the PLC logic program.
Report this error to your dealer, along with the values from W14 and W15. Also report what function the machine was performing when the fault occurred.
You must shut down and cycle the power to clear this fault.
References:
PLC W14: Copy of internal SV_PLC_FAULT_STATUS, indicating the type of problem
PLC W15: Copy of internal SV_PLC_FAULT_ADDRESS, indicating the location of the problem
The MPU11 motion controller detected loss of fiber optic communication from the GPIO4D interface unit.
Check the optical fibers. Verify that they have not been bent, kinked, or pulled loose from their sockets. Verify that they are both plugged into the correct sockets (1 to 1 and 3 to 3, on both boards).
Press and release Emergency Stop to clear the fault.
References:
Schematic: Lines 60, 117
The GPIO4D interface unit reported back to the MPU11 motion controller a loss of fiber optic communication from the MPU11. This indicates that Fiber 3 is functioning normally, but Fiber 1 may have problems.
Check the optical fibers. Verify that they have not been bent, kinked, or pulled loose from their sockets. Verify that they are both plugged into the correct sockets (1 to 1 and 3 to 3, on both boards).
Press and release Emergency Stop to clear the fault.
References:
Schematic: Lines 60, 117
One of the axis servo drives detected a fault. Possible causes include overload, overheat, or damage to the motor power or encoder cables.
Press and release Emergency Stop to clear the fault.
If you have a handheld digital operator (Yaskawa JUSP-OP02A-E), you can open the control cabinet and check the drives themselves for an alarm code.
References:
PLC INP17: indicates Z servo drive alarm state.  Green = closed = okay, Red = open = fault
PLC INP18: indicates X servo drive alarm state.  Green = closed = okay, Red = open = fault
Schematic: Lines 15, 20, 61, 63
The spindle drive unit is reporting a fault condition.
If practical, check the LCD display on the spindle drive itself for a fault code.
Press and release Emergency Stop to clear the fault.
References:
PLC INP5: indicates spindle drive status.  Green = closed = okay, Red = open = fault
Schematic: Lines 8, 75
The MPU11 motion controller detected loss of communication from the operator panel in the console.
Check for damage or disturbance to the cable between the back of the panel in the console, through the machine chases to the MPU11 board on the lower right side wall of the cabinet.
Press and release Emergency Stop to clear the fault.
References:
Schematic: Lines 117, 141
The operator panel in the console reported back to the MPU11 motion controller a loss of communication from the MPU11. This indicates the outgoing signal in the jog panel cable is functioning normally, but the return signal may have problems.
Check for damage or disturbance to the cable between the back of the panel in the console, through the machine chases to the MPU11 board on the lower right side wall of the cabinet.
Press and release Emergency Stop to clear the fault.
References:
Schematic: Lines 117, 141
You exited the CNCM control software without first pressing Emergency Stop.
Always press Emergency Stop prior to exiting the control software.
Press and release Emergency Stop to clear the fault.
More than ten minutes of cycle time have passed, but the lube pump has not pressurized the lube system. Check the level in the lube tank and check for open or broken lines. Check for damage to the power cable leading to the lube unit.
Press and release Emergency Stop to clear the fault.
References:
PLC OUT33: indicates lube pump power.  Green = On, Red = Off
PLC INP4: indicates lube pressure switch (S41) state.  Green = closed = pressure up, Red = open = pressure down
Machine Parameter 920: Allowable time, in seconds, to build pressure
Schematic: Lines 74, 121
The lube pump pressurized the lines, but pressure did not then bleed back down in a reasonable length of time. This probably indicates clogged lines.
Press and release Emergency Stop to clear the fault.
References:
PLC INP4: indicates lube pressure switch (S41) state.  Green = closed = pressure up, Red = open = pressure down
Machine Parameter 921: Allowable time, in seconds, to relieve pressure
Schematic: Line 74
The regenerative braking controller for the spindle drive has tripped its overload breaker.
If this fault occurs while running a program cycle which calls for frequent and rapid spindle speed changes or starts and stops, try reducing RPM or extending cycle time. Use the G50 S_ code to limit the maximum RPM during constant surface speed cutting.
Power down, open the cabinet, and press the black "ON" switch on the braking unit (at the top of the panel) to reset the tripped overload.
Press and release Emergency Stop if needed to clear the fault.
References:
PLC INP36: indicates brake unit state.  Green = closed = okay, Red = open = overload tripped
Schematic: Lines 4, 85
Starter overload MOL2, for the flood coolant pump, has tripped.
Check for possible causes, such as a clogged or jammed coolant pump.
Power down, open the cabinet, and reset the tripped overload using the blue reset button on the overload unit itself. The motor starter and overload are near the bottom of the panel, in the center.
References:
PLC INP37: indicates MOL2 state.  Green = closed = okay, Red = open = fault
Schematic: Lines 25, 86
Overload unit MOL3, for the spindle motor blower, has tripped.
Check for possible causes, such as a blocked or clogged blower.
Power down, open the cabinet, and reset the tripped overload using the blue reset button on the overload unit itself. The overload is near the bottom of the panel, in the center.
References:
PLC INP38: indicates MOL3 state.  Green = closed = okay, Red = open = fault
Schematic: Lines 10, 86
The chuck cover was opened without first pressing Emergency Stop.
The control cannot directly detect the chuck guard. However, if the chuck guard is open then the safety relay SR1 will open, which in turn will cause master control relay CR1 to open. If the control sees CR1 open for no other reason (such as a known fault or Emergency Stop) then it assumes that the chuck guard is open.
Finish unloading and loading parts; close the chuck cover; then press and release Emergency Stop to clear the fault.
References:
PLC INP35: indicates CR1 state.  Green = closed, Red = open
Schematic: Lines 50, 52, 85
The control lost communication with the PLC I/O expansion board.
Power down, open the cabinet, and check the connections at both ends of the gray cable which connects H3 on the GPIO4D unit (bottom right side of panel) to H3 on the PLCADD1616 board (center of panel).
References:
PLC W36: bitmap of detected PLC expansion boards.  1 = one board detected
Machine Parameter 900: bitmap of expected PLC expansion boards.  1 = one board expected
You had the apron panel engaged to travel with the carriage. You must disengage the apron panel from the carriage before running any automatic program cycle.
Disengage the apron panel using the left-hand lever, then restart your program cycle.
References:
PLC INP41: indicates apron panel lever position (S7).  Green = engaged, Red = disengaged
Schematic: Line 88
You had selected Maintenance Mode with the Aux14 key, then attempted to start an automatic program cycle.
You must cancel Maintenance Mode before you can run any automatic program cycle.
Press and hold the Aux14 key for one second to cancel Maintenance Mode.
The CNC program, in combination with the current Spindle Speed Override setting, has requested a spindle RPM lower than the minimum allowed RPM set in the Control Configuration.
No action is required, but be aware that the spindle will be running at the minimum allowed RPM, and therefore will be running faster than the requested or programmed speed.
The PLC program requested display of a message on the screen, but the provided message code was not valid.
This indicates an error in the PLC program. Report the message to your dealer, along with the value in PLC variable W16.
References:
PLC W16: stores the invalid message code
The PLC hardware detected the presence of an I/O expansion board, but the setting of Machine Parameter 900 did not tell it to expect that board in the system.
On this machine, there should be one I/O expansion board installed, and Machine Parameter 900 should be set to 1.0.
References:
PLC W36: bitmap of detected PLC expansion boards.  1 = one board detected
Machine Parameter 900: bitmap of expected PLC expansion boards.  1 = one board expected
The program attemped to run an M3 or M4 spindle-start code, but the control is still in Manual Spindle mode.
Press the SPIN AUTO/MAN key in the top row of the operator panel to select Auto Spindle mode (LED on); then press CYCLE START to resume program operation.
The program attempted to run an M7 or M8 coolant-on code, but the control is still in Manual Coolant mode.
Press the Coolant AUTO/MAN key at the left side of the coolant controls row of the operator panel to select Auto Coolant mode (LED on); then press CYCLE START to resume program operation.
If you want to run the program cycle without coolant, you can press CYCLE START to resume operation without restoring Auto Coolant mode.
A previous servo drive fault condition has been resolved, and cleared with Emergency Stop.
A previous PLC fault condition has been resolved, and cleared with Emergency Stop.
You inadvertently pressed a keyboard combination that is used for keyboard jogging controls, but keyboard jogging features have been disabled on this machine.
A previous fault condition has been cleared with Emergency Stop.
These codes usually only need to be entered once. They are stored on the control with the Machine Parameters. They should be kept on file in case the Parameters file is ever lost.
Serial Number: 100860 -- Key A (plain): 816120600
The following are necessary to unlock software features:
|
Option |
Parameter # |
Parameter Value |
1 |
Permanent Unlock |
298 |
21875.1370 |
2 |
Intercon |
300 |
20467.0107 |